This repository was archived by the owner on May 26, 2022. It is now read-only.
-
Notifications
You must be signed in to change notification settings - Fork 17
Created guide to setup local xdai node #4
Open
Draekus
wants to merge
5
commits into
darkforest-eth:master
Choose a base branch
from
Draekus:patch-1
base: master
Could not load branches
Branch not found: {{ refName }}
Loading
Could not load tags
Nothing to show
Loading
Are you sure you want to change the base?
Some commits from the old base branch may be removed from the timeline,
and old review comments may become outdated.
Open
Changes from all commits
Commits
Show all changes
5 commits
Select commit
Hold shift + click to select a range
04f7435
Created guide to setup local xdai node
Draekus 1b96888
Update connecting-to-xdai/running-your-own-xdai-node.md
Bind 3adb11e
Update connecting-to-xdai/running-your-own-xdai-node.md
Bind 61cc75f
Update connecting-to-xdai/running-your-own-xdai-node.md
Bind f844cb0
Update connecting-to-xdai/running-your-own-xdai-node.md
Bind File filter
Filter by extension
Conversations
Failed to load comments.
Loading
Jump to
Jump to file
Failed to load files.
Loading
Diff view
Diff view
There are no files selected for viewing
This file contains hidden or bidirectional Unicode text that may be interpreted or compiled differently than what appears below. To review, open the file in an editor that reveals hidden Unicode characters.
Learn more about bidirectional Unicode characters
| Original file line number | Diff line number | Diff line change |
|---|---|---|
| @@ -1,5 +1,40 @@ | ||
| # Running your own xDAI node | ||
|
|
||
| {% hint style="info" %} | ||
| This article is a stub. Maybe you can help write it! | ||
| {% endhint %} | ||
| This guide will walk you through how to setup your own non-validator xdai node. Please be aware that you will need at least **50GB** of free storage space and a broadband internet connection in order to run the node. | ||
|
|
||
| ## Getting Started | ||
|
|
||
| This guide will be using the openethereum node software, as it is easy to use and non-developer friendly. If you want more control over your node you can use the [Nethermind](https://www.xdaichain.com/for-developers/install-xdai-client/nethermind) client written in .NET or you could use the Rust implementation of [Openethereum](https://www.xdaichain.com/for-developers/install-xdai-client/parity). | ||
|
|
||
| ### Download | ||
|
|
||
| - [Openethereum Linux v3.2.6](https://github.com/openethereum/openethereum/releases/download/v3.2.6/openethereum-linux-v3.2.6.zip) | ||
|
|
||
| - [Openethereum MacOS v3.2.6](https://github.com/openethereum/openethereum/releases/download/v3.2.6/openethereum-macos-v3.2.6.zip) | ||
|
|
||
| - [Openethereum Windows v3.2.6](https://github.com/openethereum/openethereum/releases/download/v3.2.6/openethereum-windows-v3.2.6.zip) | ||
|
|
||
| - [Source](https://github.com/openethereum/openethereum/archive/refs/tags/v3.2.6.zip) | ||
|
|
||
|
|
||
| ## Running Your Node | ||
|
|
||
| Firstly, unzip the archive you downloaded. Next, locate the binary file called ***openethereum*** and run it with the following command | ||
|
|
||
| ``` | ||
| ./openethereum --chain xdai --jsonrpc-port=8545 --jsonrpc-cors=all --jsonrpc-interface=all --jsonrpc-hosts=all --jsonrpc-apis=web3,eth,net,parity --ws-interface=all --ws-apis=web3,eth,net,parity,pubsub --ws-origins=all --ws-hosts=all --ws-max-connections=10 --max-peers=100 | ||
| ``` | ||
|
|
||
| Or for those running Windows | ||
|
|
||
| ``` | ||
| ./openethereum.exe --chain xdai --jsonrpc-port=8545 --jsonrpc-cors=all --jsonrpc-interface=all --jsonrpc-hosts=all --jsonrpc-apis=web3,eth,net,parity --ws-interface=all --ws-apis=web3,eth,net,parity,pubsub --ws-origins=all --ws-hosts=all --ws-max-connections=10 --max-peers=100 | ||
| ``` | ||
|
|
||
| ## Syncing The Chain | ||
|
|
||
| If you succesfully started the node it should look something like this | ||
|
|
||
| 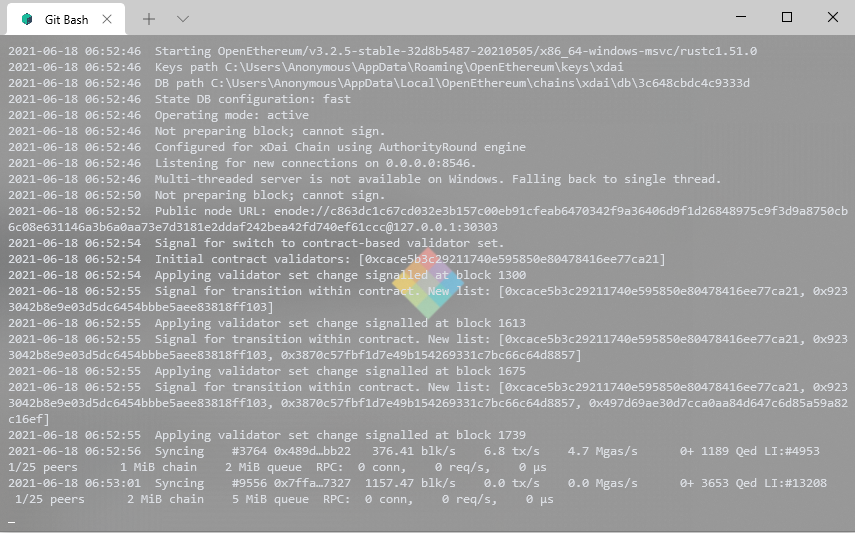 | ||
|
|
||
| Now all that's left to do is wait for your local node to synchronize with the current xdai chain. | ||
Add this suggestion to a batch that can be applied as a single commit.
This suggestion is invalid because no changes were made to the code.
Suggestions cannot be applied while the pull request is closed.
Suggestions cannot be applied while viewing a subset of changes.
Only one suggestion per line can be applied in a batch.
Add this suggestion to a batch that can be applied as a single commit.
Applying suggestions on deleted lines is not supported.
You must change the existing code in this line in order to create a valid suggestion.
Outdated suggestions cannot be applied.
This suggestion has been applied or marked resolved.
Suggestions cannot be applied from pending reviews.
Suggestions cannot be applied on multi-line comments.
Suggestions cannot be applied while the pull request is queued to merge.
Suggestion cannot be applied right now. Please check back later.
Uh oh!
There was an error while loading. Please reload this page.
There was a problem hiding this comment.
Choose a reason for hiding this comment
The reason will be displayed to describe this comment to others. Learn more.
Please add this screenshot to .gitbook/assets