A comprehensive implementation of various neural network architectures built from scratch in Python, using only NumPy for computational operations. This project aims to provide educational implementations of fundamental neural network algorithms with a clean, builder-pattern API.
- Project Structure
- Installation
- Implemented Algorithms
- Examples
- Extensibility
- Visualization
- Limitations
- Contributing
- License
nn-from-scratch/
├── src/
│   ├── neural/             # Feedforward Neural Networks
│   │   ├── core/
│   │   │   ├── activations.py
│   │   │   ├── costs.py
│   │   │   ├── initializers.py
│   │   │   └── layers.py
│   │   ├── network.py
│   │   ├── factory.py
│   │   └── builder.py
│   ├── perceptron/         # Perceptron Networks
│   │   ├── core/
│   │   │   └── activations.py
│   │   ├── network.py
│   │   ├── factory.py
│   │   └── builder.py
│   └── madaline/           # MADALINE Networks
│       ├── core/
│       │   └── trainer.py
│       ├── network.py
│       ├── factory.py
│       └── builder.py
└── README.md         # Project Documentation
Installation Steps
-
Clone the repository:
git clone https://github.com/your-username/nn-from-scratch.git cd nn-from-scratch -
Install dependencies:
pip install -r requirements.txt
Note: The project uses
numpy,scikit-learn, andplotlyfor numerical computations and visualizations.
Implementation of the Multi-layer neural networks with backpropagation training.

- Customizable Neural Network Architecture: Add layers with different activation functions and weight initializers.
- Cost Functions: Support for MSE, MAE, and Huber loss functions.
- Activation Functions: Includes Sigmoid, ReLU, Leaky ReLU, and Linear activations.
- Weight Initializers: Uniform and Nguyen-Widrow initializers.
- Training Features: Early stopping based on error thresholds and patience.
- Visualization Tools: Plot loss curves, decision boundaries, and confusion matrices.
- Use Cases: Supports binary classification, multi-class classification, and regression tasks.
- Builder pattern API: Convenient for intuitive network construction
Code Examples
Use the NeuralNetworkFactory to create a neural network:
from src.neural.factory import NeuralNetworkFactory

model = (
   NeuralNetworkFactory.create(input_size=2)
   .add_layer(n_units=20, activation="sigmoid", initializer="nguyen_widrow")
   .add_layer(n_units=20, activation="sigmoid", initializer="nguyen_widrow")
   .add_layer(n_units=1, activation="sigmoid")
   .compile(learning_rate=0.2, cost_function="mse")
   .build()
)Train the model using the train method:
inputs = np.array([[0, 0], [0, 1], [1, 0], [1, 1]])
targets = np.array([[0], [1], [1], [0]])

model.train(inputs, targets, epochs=5000)Plot the loss curve:
from src.core.visualizers import Visualizer

Visualizer.plot_loss(model.cost_history).show()
Visualize the decision boundary (for 2D inputs):
Visualizer.plot_decision_boundary(model, inputs, targets).show()Predict outputs for new inputs:
predictions = model.predict(inputs)
print(predictions)Implementation of the classic Perceptron algorithm for binary classification.

- Single-neuron model for linear separation problems
- Threshold and Step activation functions
- Configurable learning rate
- Simple and efficient implementation
import numpy as np
from src.components.visualizers import Visualizer
from src.perceptron.factory import PerceptronFactory

# AND logic gate problem
inputs = np.array([[0, 0], [0, 1], [1, 0], [1, 1]])
targets = np.array([[-1], [-1], [-1], [1]])

# Create and configure the perceptron
model = (
   PerceptronFactory.create(input_size=2)
   .compile(learning_rate=0.2, activation_function="step")
   .build()
)

# Train the model
model.train(inputs, targets, epochs=100)

# Visualize decision boundary
Visualizer.plot_decision_boundary(model, inputs, targets).show()Implementation of MADALINE (Many Adaptive Linear Elements), one of the earliest multi-layer neural networks.

- Multiple adaptive linear neurons in the hidden layer
- Three training strategies:
- Standard: Updates all units
- Rule One: Selective update for positive targets
- Rule Two: Network majority voting-based updates
- Threshold or Step activation functions
- Advanced training rules for non-linearly separable problems
import numpy as np
from src.madaline.factory import MadalineFactory
from src.components.visualizers import Visualizer

# XOR problem (using -1/1 encoding)
inputs = np.array([[1, 1], [1, -1], [-1, 1], [-1, -1]])
targets = np.array([[-1], [1], [1], [-1]])

# Create and configure the MADALINE network
model = (
   MadalineFactory.create(input_size=2, hidden_size=2)
   .compile(learning_rate=0.5, activation_function="threshold", trainer_strategy="rule_1")
   .build()
)

# Train the model
model.train(inputs, targets, epochs=100)

# Visualize decision boundary
Visualizer.plot_decision_boundary(model, inputs, targets).show()The notebook also demonstrates multi-class classification using synthetic datasets like blobs and the IRIS dataset. You can see the results in the dev/experimental_results.ipynb notebook.
The framework is designed to be modular. You can easily add:
- New Activation Functions: Extend the
Activationclass insrc/neural/core/activations.py. - New Cost Functions: Extend the
CostFunctionclass insrc/neural/core/costs.py. - New Initializers: Extend the
Initializerclass insrc/neural/core/initializers.py. - New Algorithms: Implement a new algorithm by creating a folder in
src/with the following structure:Then integrate it with the existing visualization and evaluation tools.src/your_algorithm/ ├── core/ # Algorithm-specific components │ └── ... ├── network.py # Main implementation ├── factory.py # Factory pattern implementation └── builder.py # Builder pattern implementation
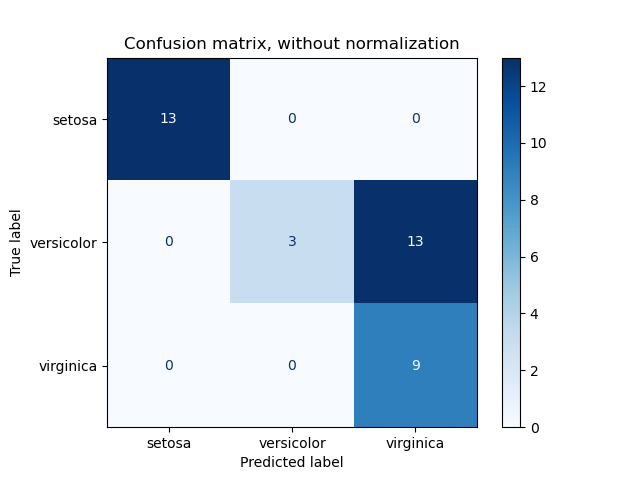
The src/components/visualizers.py module provides tools for visualizing:
| Loss Curves | Decision Boundaries | Confusion Matrices |
 |
 |
 |
- The framework is not optimized for large-scale datasets or deep networks.
- Training is performed sequentially, which may be slow for large datasets.
Contributions are welcome! Here are some ways you can contribute:
- Add new neural network architectures
- Implement additional activation functions
- Add more cost functions or optimization algorithms
- Improve documentation or add more examples
- Fix bugs or optimize existing code
Please follow these steps for contributing:
- Fork the repository
- Create a new branch (git checkout -b feature-branch)
- Make your changes
- Test your changes
- Commit your changes (git commit -m 'Add new feature')
- Push to the branch (git push origin feature-branch)
- Create a Pull Request
This project is licensed under the MIT License. See the LICENSE file for details.