This repository stores the code and other software resources defining the WFR Data Acquisition System (DAQ).
A key assumption with the system is that it exists connected to a secure network. If not, disabling the WiFi adapter on the Pi and reverting to Ethernet only as a means of connecting to the DAQ is advised.
For hardware setup, please refer to the following excerpt from THEORY_README.md:
This project has been tested to work with a MCP2515-based CAN Bus board, which connects to SPI0 on the Raspberry Pi Model 4B:
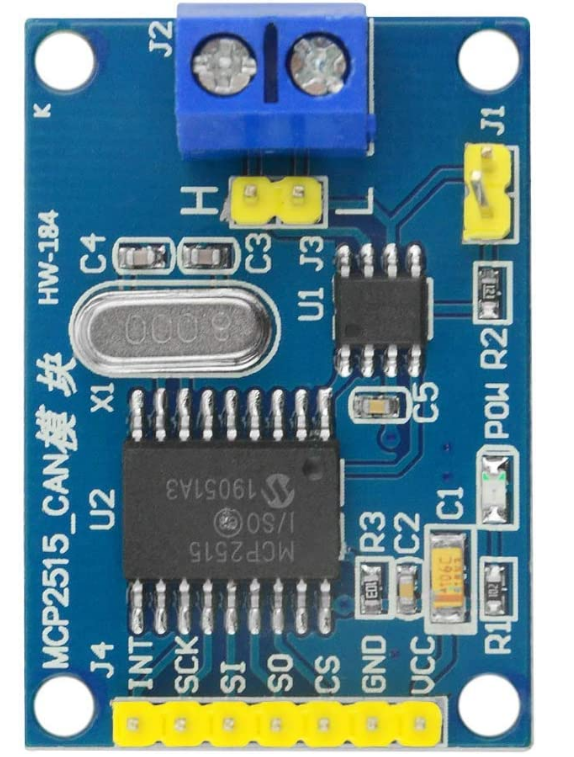
The pin connection is as follows:
| MCP2515 Module | Raspberry Pi Pin # | Pin Description |
|---|---|---|
| VCC | pin 2 | 5V (it's better to use external 5V power) |
| GND | pin 6 | GND |
| SI | pin 19 | GPIO 10 (SPI0_MOSI) |
| SO | pin 21 | GPIO 9 (SPI0_MISO) |
| SCK | pin 23 | GPIO 11 (SPI0_SCLK) |
| INT | pin 22 | GPIO 25 |
| CS | pin 24 | GPIO 8 (SPI0_CE0_N) |
Due to the relatively rapid read/write speed requirements of the data acquisition use case, a Samsung T7 external SSD is used as the main storage volume. 500 GB storage capacity is recommended, but more is always welcome. The SSD connects to the Raspberry Pi using a USB-C-to-USB-A 3.1 cable. For connection integrity, it is important that the SSD and Raspberry Pi are packaged as a unit, such that the accelerations experienced by the SSD and the Pi are similar. Otherwise, high-variation cable strain may cause physical damage to the SSD, the cable, the Raspberry Pi, or some combination thereof. Even transient disconnection of the SSD could cause catastrophic data loss. Hence, data should be backed up and extracted from the unit as frequently as possible.
This project heavily relies on SocketCAN which is the Linux kernel's default CAN Bus interface implementation. It treats CAN Bus interface devices similar to regular network devices and mimics the TCP/IP protocol to make it easier to use. It also natively supports MCP2515 based controllers. Since this is built-in, nothing needs to be installed, however the /boot/config.text needs to have the following line appended to it:
dtoverlay=mcp2515-can0,oscillator=8000000,interrupt=25
This gets the Linux kernel to automatically discover the CAN Controller on the SPI interface. If your interface pin has a different oscillator frequency, you can change that here.
Now reboot the Pi and check the kernel messsages (you can bring this up in the terminal by using the command: dmesg | grep spi) or dmesg to view all kernel messages), and you should see the following:
[ 8.050044] mcp251x spi0.0 can0: MCP2515 successfully initialized.
Finally, to enable the CAN Interface run the following in the terminal:
sudo /sbin/ip link set can0 up type can bitrate 500000
If you are using a different bitrate on your CAN Bus, you can change the value. You'll need to edit the declarations of bus_one and bus_two in data_logger/canInterface.py to match the new bitrate.
You will need to run this command after every reboot, however you can set it to run automatically on startup by appending the following to the /etc/network/interfaces file:
auto can0
iface can0 inet manual
    pre-up /sbin/ip link set can0 type can bitrate 500000 triple-sampling on restart-ms 100
    up /sbin/ifconfig can0 up
    down /sbin/ifconfig can0 down
And that's everything to get the CAN Bus interface working! Since SocketCAN acts like a regular network device, we can get some statistic information by using the ifconfig terminal command, which can be obtained with the net-tools package using sudo apt-get install net-tools.
CAN-utils is a set of super useful CAN debugging tools for the SocketCAN interface. You can install it using the following command:
sudo apt-get install can-utils
This allows us to dump CAN Bus traffic to logs, send test messages and simulate random traffic. Please see the readme on their GitHub page for more details.
Connect the SSD/storage volume to a host computer. Use Raspberry Pi Imager to install Raspberry Pi OS on the volume. Make sure to configure SSH, network, and administrator settings before the Raspberry Pi Imager installation process. Ensure the hostname (default: "raspberrypi") of the device is noted.
The Raspberry Pi does not need to be connected to a Layer-3 (IP) communications network to function. However, it is highly recommended that it is. Without connection to a network, data egress, data visualization, and system monitoring are deeply impeded, if not impossible.
Raspberry Pi can connect to IP networks using WiFi or wired Ethernet. WiFi is vastly more convenient, but note that on networks with high network segregation (e.g., secured enterprise networks, like Western's), interdevice connectivity may not be possible. Hence, it is recommended that an external network is established using a router. The network does not need to be connected to the internet for DAQ use, but the DAQ does need an internet connection for initial software setup and updates.
It is expected that the reader is relatively familiar with SSH and SFTP for remote access to the Raspberry Pi. If not, please refer to the internet for a guide on connecting to a Raspberry Pi via SSH. The recommended application for development is MobaXTerm on Windows, and Royal TSX on MacOS. These applications are capable of multi-tabbed operation, so many SSH terminals and SFTP file transfer sessions may be open at a time. The following assumes SSH and SFTP are established and accessible by the user.
On your own computer (Host), use Git CLI to clone the repository, or download as a zip. Duplicate .env.example, rename it .env, and add a value for the INFLUX_PASSWORD environment variable. Save after editing. Don't worry about the INFLUX_TOKEN environment variable for now.
On the Raspberry Pi (RPi), create a folder in the home (~/) directory called daq with the command mkdir ~/daq.
On Host, establish an SFTP session with RPi, and transfer the cloned repository to ~/daq/ on RPi.
Follow the steps here to install Docker on the RPi.
On RPi, navigate to the daq folder with the command, cd ~/daq. Run the command docker compose up -d to build the containers required for the application, and link the containers together.
You can shut down the application by navigating to the ~/daq folder and executing the command, docker compose down -v.
First, a database bucket and an authentication token must be generated from InfluxDB. To do this:
- Run command,
docker exec -it wfrdaq-influxdb-1 /bin/bash, to get command-line access to the container - Set up InfluxDB by running the command:
influx setup \
    --username $INFLUX_USERNAME \
    --password $INFLUX_PASSWORD \
    --org $INFLUX_ORGANIZATION \
    --bucket $INFLUX_BUCKET \
    --force
- Make a configuration and set it as active to authenticate:
influx config create --config-name grafana_cfg \
  --host-url http://localhost:8086 \
  --org $INFLUX_ORGANIZATION \
  --username-password $INFLUX_USERNAME:$INFLUX_PASSWORD \
  --active
- Get the authorization token by running the command:
influx auth list \
    --user $INFLUX_USERNAME \
    --hide-headers | cut -f 3
- Copy the string output from step 3, paste this into
.envas the value for$INFLUX_TOKEN, and save the.envfile - From the InfluxDB command line, go back to the Pi's CLI by entering the command,
exit - Shutdown the docker project with the command
docker compose down -v - Recompose the Docker project with
docker compose up -d
InfluxDB is now set up.
- On Host, open a web browser, and navigate to the URL,
http://raspberrypi.local:3000/, replacing "raspberrypi" with the hostname you selected during Raspberry Pi OS installation if you changed it from the default - Enter "admin" for both prompts
- Change the password to whatever password you chose for the
$INFLUX_PASSWORDenvironment variable - Click the stacked vertical bars in the top left, expand the "connections" item in the dropdown, and click "add new connection"
- Search "influxdb", click it, and then click the "add new data source" button
- Set the following:
- Query Language:
InfluxQL - URL:
http://influxdb:8086 - Database:
RaceData - User:
grafana - Password: whatever password you set for the
$INFLUX_PASSWORDenvironment variable in .env file - HTTP Method: GET
- Query Language:
- Click "+ Add header", and set "Header" to "Authorization", and "Value" to "Token [InfluxDB token from Initializing InfluxDB]" (the capital "T" in "Token" is very important)
- Click "save & test" in the bottom. You should see a box appear at the bottom of the screen that says "datasource is working. 0 measurements found" with a green checkmark on the left. This means the connection from Grafana to InfluxDB is working
- Click "add new connection" on the left-hand side of the page, then search for "MQTT" and click it
- On the MQTT data source page, click the "install" button. After installed, click the "add new datasource" button
- On the configuration page, for the "URL" field, enter
tcp://mqtt_broker:1883, and click "save & test". You should get the same confirmation box in as in step 8
Now you can make visualizations in Grafana with MQTT and influxdb data sources. Note that MQTT topic subscription is case-sensitive. Also, MQTT topics are defined as [CAN Device Name as per DBC]/[Measurement Name], e.g. "Sensor_board_2_1/Sensor1". Make sure to save dashboards frequently.
The DAQ user interface is provided by a web application, which can be accessed from a computer attached to the same network as the Raspberry Pi. On a web browser, enter the URL: http://[hostname].local. If the Raspberry Pi's hostname as selected in the Raspberry Pi Imager is raspberrypi, the link is http://raspberrypi.local. As long as the Docker project is composed, you'll be able to access the site. It will look like this:

The UI is self-explanatory. The webpage refreshes once every minute to update the session hash to make sure it's reflective of the current state.
Currently, CSVs are the only download method. Motec LD downloads will be added in the near future.
Refer to the document, VIRTUAL_DATASTREAM_GENERATION.md, for information about how to do this.
Motec log generator was originally written by stevendaniluk and is available here: https://github.com/stevendaniluk/MotecLogGenerator.
DBCs are easily swappable using the following steps:
- SSH into pi as "pi" user
cdto~/daq-2023/daq-2023, and downcompose the project withdocker compose down -v- Edit (with
nano), or replace (with SFTP; does not work over direct ethernet connection) DBC files in~/daq-2023/daq-2023/containerization/volumes/dbc cdback to~/daq-2023/daq-2023, then recompose the project withdocker compose up -d